Hallöchen zum Ende der neunten Staffel von "Ich bin ein Star - Holt mich hier raus!"
Die Staffel 2015 ist jeden Tag als die langweiligste in der Geschichte der Sendung bezeichnet worden. Grüne Langeweile... Ja, kein Zoff, keine bemerkenswerte oder überhaupt welche Ereignisse. Nur Walter allein hat ein bisschen den Schlafmützenhaufen aufgemischt. Dann wurde er rausgewählt und was passiert? Man redet andauernd wieder über Walter. Maren hat es bis zur Dschungel-Krone geschafft, was ich ihr gönne: sie hatte als einzige in diesem Camp Eier in der Hose!
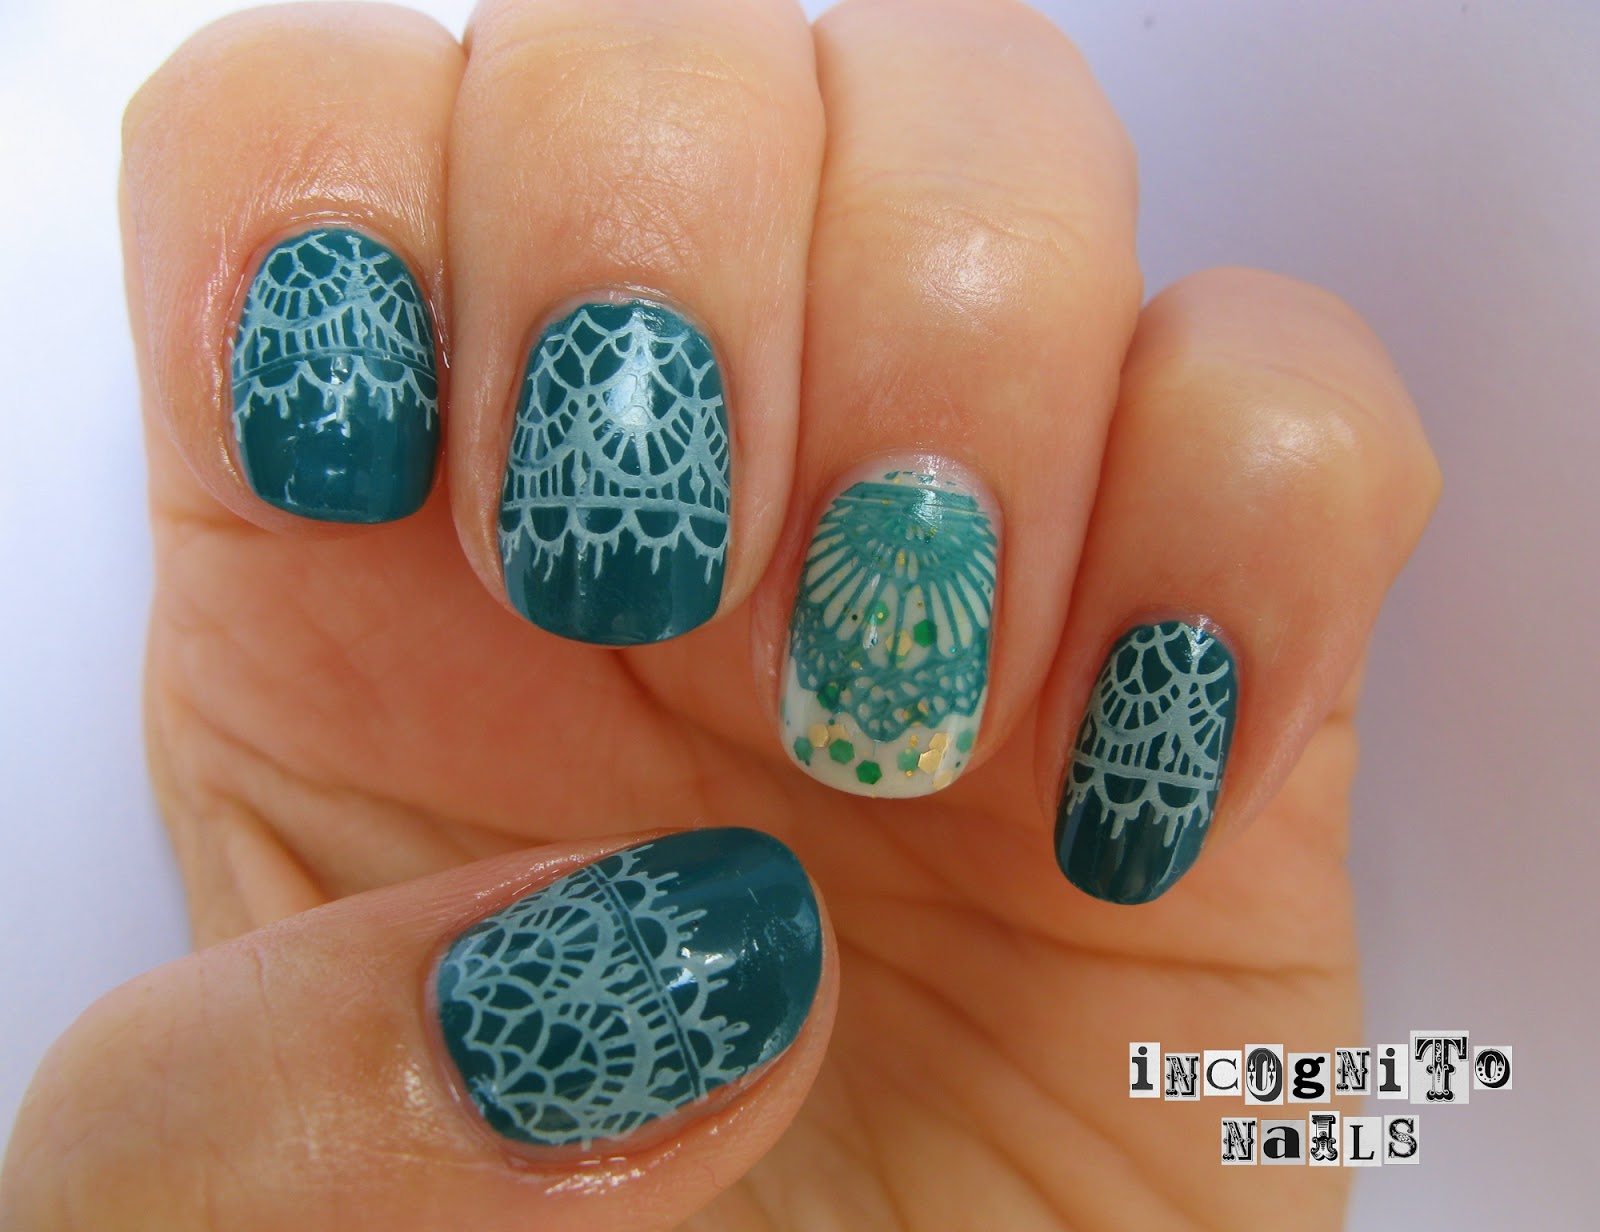
Aus dem gegebenen Anlass gibt es bei mir eine "Dschungel"-Maniküre.
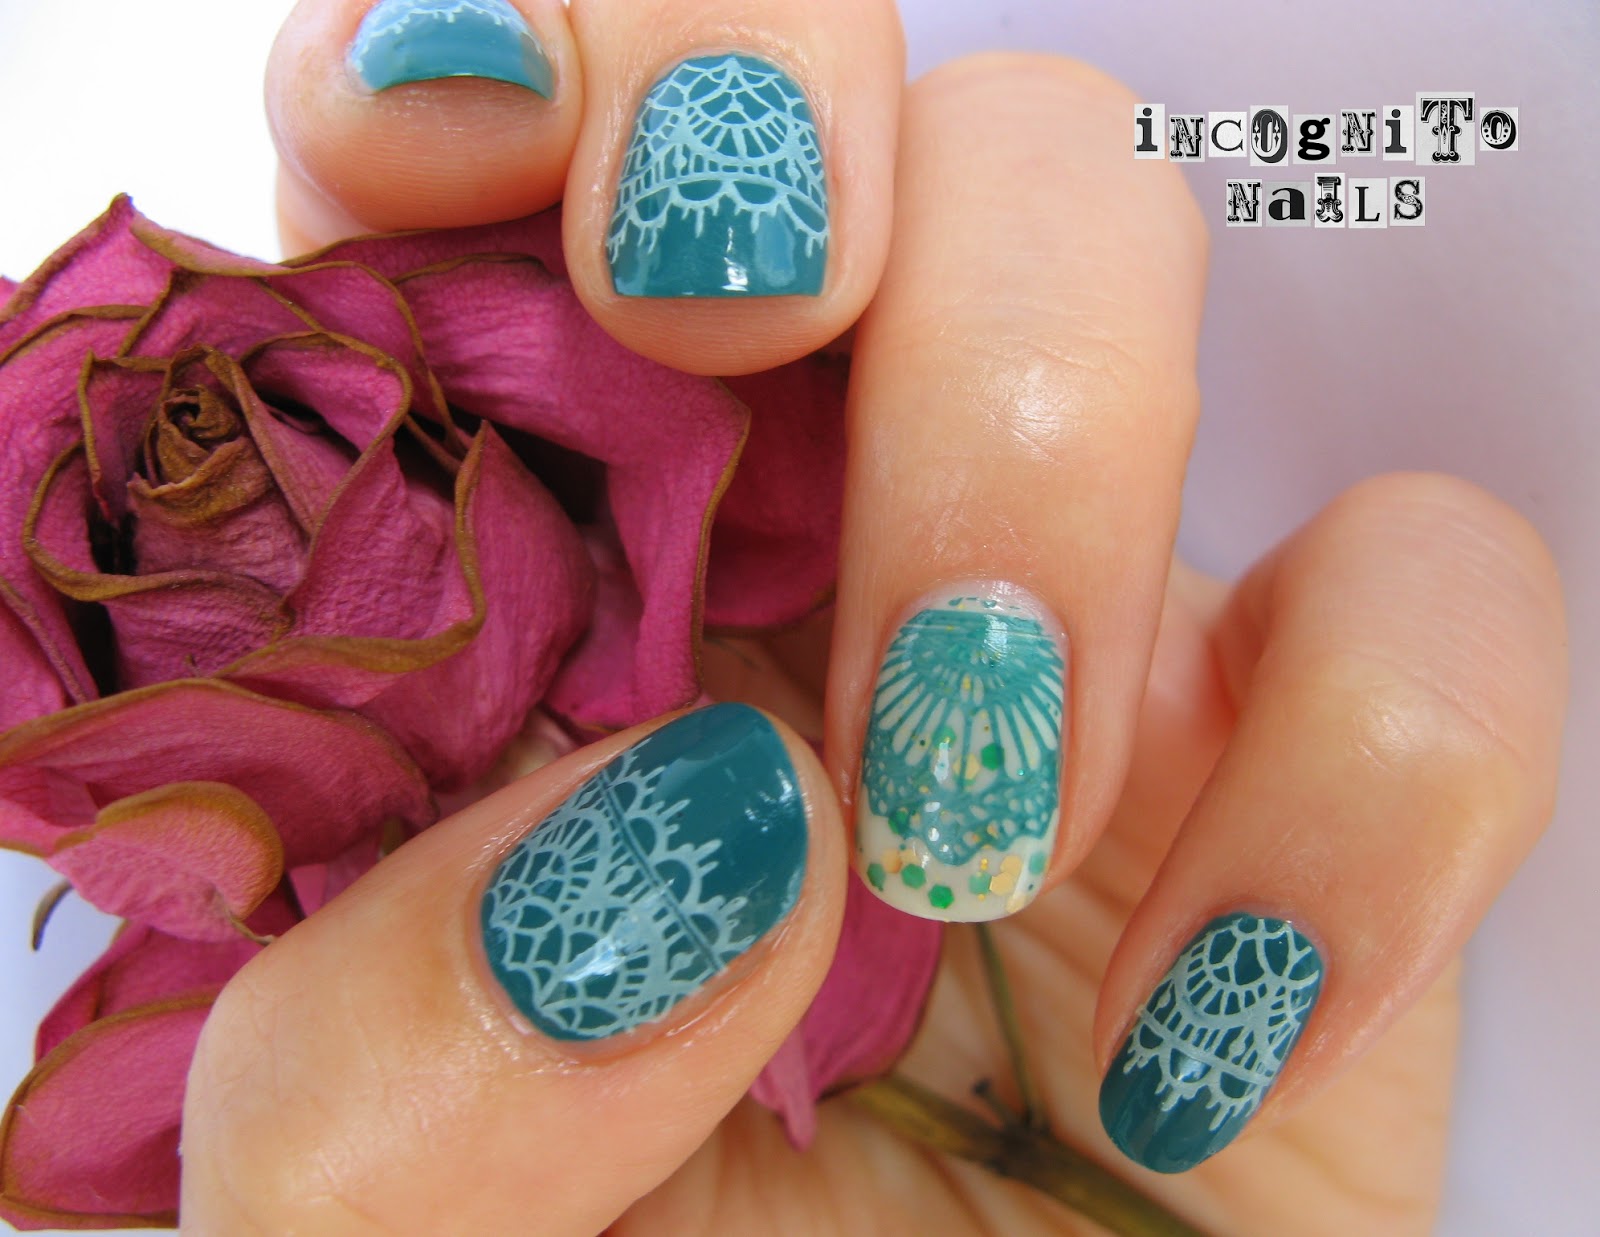
Über eine hellgrüne Basis habe ich ein paar Farbakzente aufgesponget (hm, gibt's so ein Wort?). Dann habe ich mit der Schablone von Petla "Wishes" mit dem dunkleren Grün (alessandro mini Voyeuristic Green) Bananenblätter drauf gestempt. Auf dem Ringfinger habe ich Grassmuster von MoYou London mother nature 08.
Und was ich schon seit einer längeren Zeit ausprobieren wollte, ist Stemping mit Transferfolien. Ich dachte, ein paar grün glänzende Tierchen passen in das Blätterdickicht perfekt. Essence-Schablonen haben zwei passende Tiere geliefert: eine Eidechse und eine Schlange. Die Versuche mit den normalen Stemping-Lacken waren nicht so erfolgreich: Transferfolie hat nicht gut gehaftet. Aber von Conny Vogel (in einer FB-Community) gab es einen Tipp, nämlich Modellbaufarben zu benutzen, z.B. von Revell. Und es hat tatsächlich wunderbar geklappt: ich habe zuerst mit der schwarzen Farbe Motive auf die Nägel gestempelt und sofort die Folie darauf gedrückt: und voilà - Eidechse und Schlange sind da!
Damit der holografische Glanz der Folie nicht zertört wird, trage ich zuerst zwei Schichten von einem Acryl-Klarlack auf. Danach kommt eine Schicht von Top-Coat. Obwohl es auf dem Klarlack klar und deutlich geschrieben steht, dass er "nicht gilbend" wäre, hat er wohl trotzdem die Farben unter der Folie beeinflusst: über die Nacht hat er die relativ dunkle grüne Farbe ausgebleicht. Man beachte die Ränder vom Nagel, wo nicht so viel vom Klarlack aufgetragen wurde:
Gut, daraus lernen wir, dass die unteren Schichten eventuell mit einem Überlack zu schützen sind, wenn man nicht gerade so einen Farbenwechsel beabsichtigt.
Bis zum nächsten Mal!
#ibes, #dschungelcamp2015
Posts mit dem Label moyou london werden angezeigt. Alle Posts anzeigen
Montag, 2. Februar 2015
Sonntag, 30. November 2014
Alice
Hello!
The last part of MoYou London's contest was themed "Alice". This time I didn't take this too literally and discarded ideas to picture the heroine. This mani was a bit inspired by other nailistas' work in previous weeks.
Alice colours are blue and white, I guess. Also check pattern and roses belong to the theme. Luckily MoYou has got a plate with the quote by O. Wild: "Be youself; everyone else is already taken." I think this phrase suits Alice very well, as she stuck in her personality crisis after changing her size repeatedly.
And we cannot miss some cake crying: "Eat me!"
After putting all the motifs together I put some pearls and white 3D roses from essence "jewel set".
I used
as base colour: misslyn silk touch 07
as sponging nuances: varios polishes in light blue, white and stone-grey-blue
as stamping polish: Yves Rocher Argent nacré, white stampy by essence
stamping images: MoYou London scholar 02 (quote), landscape 05 (roses), princess 08 (muffin), princess 10 (check).
#Moyou30K
Sonntag, 23. November 2014
Mad Hatter
Hello!
Just by chance I saw the pics of other people who participated in MoYou London's contest "Alice in Wonderland" on Instagram. Some had wonderful ideas about White Rabbit and Mad Hatter and they inspired me to try too. Unfortunately there are restrictions: you have to use MoYou plates. Originally I had another idea whithout MoYou plates, but then I changed it. Somehow I am not really satisfied how it turned out...
The theme of this week were Mad Hatter.
I wanted to go to the roots and looked out for illustrations by J. Tenniel. They were all black and white, but some of the pictures were coloured later, although the colours were not uniform.
I took a pattern of Hatter's suit light yellow and black checked. This is MoYou plate princess collection 13. Than I painted the famous hat with the tag 10/6 and his bow tie. Teacup and teapot come from Winstonia W215 and MessyMansion MM10.
#Moyou30K
Donnerstag, 20. November 2014
Kind of victorian
Hello!
I dug out a light pinkish lavender colour by Catrice from LE Candyshock (C01 I Scream: Ice Cream!), which I didn't wear long enough.
The tourist collection 03 by MoYou London has images you would associate with Paris, but it has also some stripes-laces and lady-in-a-frame images. I used them for this look. Not sure, if that would be called victorian...
I stamped with essie Smokin' hot.
Sonntag, 16. November 2014
Leadlighted peonies
Hello again!
We've got flower power! Lovely peonies from MoYou London plate pro collection 06. This is the first time I used the leadlight technique: you just colour your design over the stamped nail with sheer nail polishes. The base is typically white or other light colour and you stamp with black or otherwise dark nuance, which would be well seen through the sheer polish layer.
First I painted my nails with pure white and added some glittery sheer white polish (Yves Rocher Blanc neige) above. Then I stamped with black. And then I coloured the peonies with some polishes which I made more translucent by adding clear polish. Also I've got a really sheer red polish by Shiseido, and it suits very well for leadlighting. It is on the big petals around and over peach-colored areas. Due to its transparency the polish looks rather pink than red.
In the middle of November my chrysanthemums are breaking into bloom.
I think leadlight technique is more fun, if you've got ready to use sheer polishes. Some of mixed with clear polishes are stell not transparent enough.
Sonntag, 28. September 2014
Golden Autumn
Hello!
The autumn is coming and the foliage is turning red and yellow and you are just surrounded by explosions of warm colours! This has to be celebrated, right?
So we do.
First I painted my nails with plain yellow polish by p2, then added two coats of p2 lemon drop from LE Summer Attack (hmm, kind of wrong name here...) and sponged over it some orange, red and light-light green. I tried to keep the sponged colours very subtle.
And then I stamped with Yves Rocher Brun cuivré and MoYou mother nature 07.
It turned out better then I expected.
Some nice red leaves:
Sonntag, 17. August 2014
Yellow... Honey!
Hello Beauties!
Today's theme is stamping over yellow base. And I have got the perfect chance to try out the new mini polish by Misslyn 103 mangolicious - warm yellow nuance.
I think that colour is close to the honey and I selected some images for the honeycomb, honeybees and honey flowers.
Here we are with honeycomb from BM-422, fat bee from Winstonia W202, flowers from MoYou Princess-08 and bee and a flower from QA3 (though not sure, if it's the correct number. It was a plate with Pooh).
Sonntag, 27. Juli 2014
Amur Tiger
Today's challenge is International Tiger Day, which is held on 29th July. Tigers are amazing animals, the biggest cats in the world, but graceful and beautiful.
One very poetic description of a tiger was made by Yann Martin in his bestseller-book "Life of Pi":
My mani was inspired by this picture:
It is a siberian or amur tiger.
First I created the snow landscape over catrice Entering Atlantis: I painted with white and turquoise acryl paints fir trees covered with snow. I added also a bit Color Club Angel Kiss for sparkling.
Then the tiger body is gradient with white and orange. The head and body part on the middle finger are Moyou London Suki 01. The head on my thumb is also Moyou Suki, but 09. I did them as decals.
The ring finger is just a normal stamp over gradient. Cheeky CH2 for tiger thigh. And the tail is just freehanded.
After everything was done, I added a snow blizzard, which is surely happens in the cold Siberia. Actually the name of the snowy polish is very sommerlike: Blue Sky (Rival de Loop, Sorbet Nail Collection).
One very poetic description of a tiger was made by Yann Martin in his bestseller-book "Life of Pi":
He was incredibly muscular, yet his haunches were thin and his glossy coat hung loosely on his frame. His body, bright brownish orange streaked with black vertical stripes, was incomparably beautiful, matched with a tailor's eye for harmony by his pure white chest and underside and the black rings if his long tail. His head was large and round, displaying formidable sideburns, a stylish goatee and some of the finest whiskers of the cat world, thick, long and white. Atop the head were small, expressive ears shaped like perfect arches. His carrot orange face had a broad bridge and a pink nose, and it was made up with brazen flair. Wavy dabs of black circled the face in a pattern that was striking yet subtle, for it brought less attention to itself than it did to the one part of the face left untouched by it, the bridge, whose rufous lustre shone nearly with a radiance. Tha patches of white above the mouth came off as finishing touches worthy of a Kathakali dancer. The result was a face that looked like the wings of a butterfly and bore an expression vaguely old and Chinese.How can you not admire such creation of Mother Nature? It's impossible.
My mani was inspired by this picture:
It is a siberian or amur tiger.
First I created the snow landscape over catrice Entering Atlantis: I painted with white and turquoise acryl paints fir trees covered with snow. I added also a bit Color Club Angel Kiss for sparkling.
Then the tiger body is gradient with white and orange. The head and body part on the middle finger are Moyou London Suki 01. The head on my thumb is also Moyou Suki, but 09. I did them as decals.
The ring finger is just a normal stamp over gradient. Cheeky CH2 for tiger thigh. And the tail is just freehanded.
After everything was done, I added a snow blizzard, which is surely happens in the cold Siberia. Actually the name of the snowy polish is very sommerlike: Blue Sky (Rival de Loop, Sorbet Nail Collection).
Sonntag, 6. Juli 2014
Lacy
Today I do a many for the theme "Lace" (FB group AiS Sunday challenge).
I gathered already some plates by different makers with lace patterns, so it's a good opportunity to try them on.
Base is Yves Rocher polish 64. Menthe, which is actually dark green of the brilliant green kind. Then I stamped with BBF-04 and light green KONAD polish.
On the accent nail I used Dance Legend Kiwi Smoothie, MoYou Bridal-06 and the Menthe as stamping polish.
"It's good to touch a green, green lace of home..."
Freitag, 24. Januar 2014
ColorShow Stripped Nudes
Hello!
After some weeks of relatively high stress in my job, I went to check on the drogery shops, andI discovered so many new releases... I just cannot keep up with buying!
Maybelline brought out the new series Stripped Nudes.
I don't know exactly, what colours are in the palette of Stripped Nudes, because they were almost all sold out. I managed to secure the two following colours: Bare it all and Bronze me up.
The nude shade has relatively good covering power: two coats are enough to cover the nail completely. It's plain colour without glitter or shimmer, and is has a glossy finish.
Glittery Bronze me up contains larger slightly curled hexagons and small glitter in the same copper colour. You have to paint some more coats (I did three or four).
And for the good company I dug out my old good Copper Cabana by Catrice, which is great colour and also stamps well. It's MoYou London Pro collection 14.
Sonntag, 15. Dezember 2013
Christmas Traditions
This time I had a hard time to find what to make... Subthemes like family and dinner didn't give me a picture I could place on my nails. But caroling did.
I found some nice pics on the net, but I was sure my freehand work sucks, and I still didn't get decal paper to transfer the pictures. So I just kept it simple.
First I did a gradient with three polishes by p2: 110 ocean lady, 920 up in the air! and 010 frosted mint. Then I stamped the G-clef with notes (stamping plate MoYou London Roxy Collection 02), and "snowing notes" from the same plate.
Then I paintes the singing faces with acrylics. And added some glitter from essence effect nails (flakes I'm so dreamy).
Abonnieren
Posts (Atom)


